NEW PRODUCTS


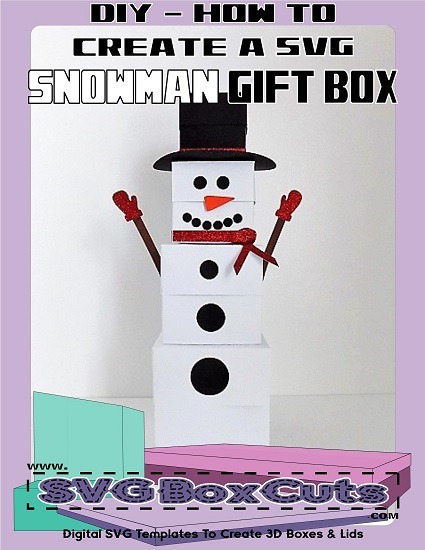
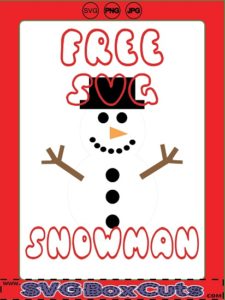
This is a tutorial explaining how to create your own SVG Snowman Gift Box, so you can make it your desired size.
To create the bottom of the SVG Snowman Gift Box Set:
Select your desired size box and lid for the base of the snowman.
(I used the 3x3x3 base with a 1.5 inch lid)
Cut and Assemble the box and lid according to template directions.
To create the middle of the SVG Snowman and buttons:
Middle Body:
In your cutting program select both the base and the lid templates. Then decrease the size until you are happy with the middle body.
(If you can not decrease the size by a percentage, I suggest you pressed the down arrow in your dimensions to decrease the templates. Write down the number of times you pressed the decrease size. I used SCAL and pressed my down arrow 7 times.)
Cut and assemble the box and lid.
Buttons:
Use the circle shape, and draw 3 different size circles in your cutting program.
Cut for the buttons. Glue one button the the “bottom” box lid. Glue one button on the “middle” box base and one on the “middle” box lid.
To create the head, face and scarf:
Head:
Select the middle body base and lid templates again, and decrease the size until you are happy.
(Once again I decreased the templates another 7 times to keep the proportions equal.)
Cut and assemble the box and lid.
Face:
Use the circle shape to draw 2 circles for the eyes and 6 circles for the mouth. (Or however many you like.)
Draw a triangle and stretch it to create the nose.
Cut to create the eyes, mouth and nose. Glue the mouth on the head base. Glue the eyes and nose on the head lid.
Scarf:
Measure the size of your “head” box.
Use the rectangle shape and draw 4 rectangles that are the same width as your snowman’s head. Choose any thickness you like.
Easiest way to create the loop is to use a Breast Cancer style ribbon.
Cut all pieces and glue on the “head” base. (I put the triangle through the opening of the loop.)
To create the hat:
Square part:
Select the “head” base and lid templates, and decrease the templates until you are happy.
(Again I decreased them 7 times to keep the proportions equal)
Cut and assemble the box and lid.
Rim of the hat:
Use the circle shape to draw a circle. Make sure the dimensions are larger than the width of the hat box.
Cut the circle.
Band around the hat:
Use the rectangle shape and draw 4 rectangles that are the width of the hat box. Choose any thickness you like.
Cut the rectangles.
Glue the bands to the hat box base. Then glue the hat box on top of the circle rim.
To create the arms and mittens:
Arms:
Use the rectangle shape and draw 2 rectangles your desired width and length.
Cut the rectangle
Mittens:
The easiest option is to use any mitten file you like.
Cut the mittens
Glue the mittens to the rectangle.
Glue the arms to the middle body.
To Finish: (Optional)
Glue the Bottom of the hat rim to the top of the “head” lid.
Glue the bottom of the “head” base to the top of the “middle body” lid.
Glue the bottom of the “middle body” base to the top of the “bottom body” lid.
This project is great to use as both a decoration and for hiding small gifts or treats!